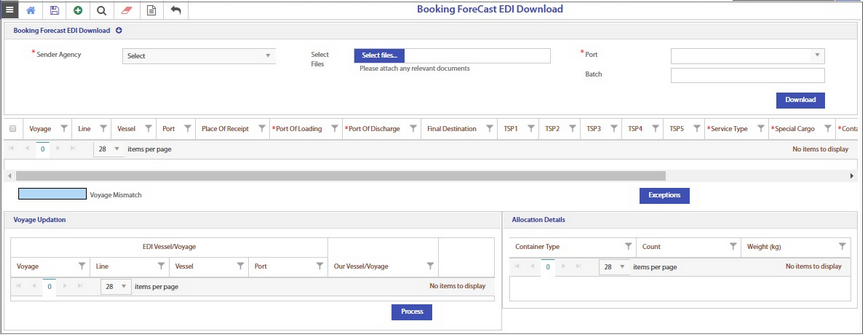
Click the Add (![]() ) icon in the Tool bar on the top pane of the Manifest entry workbench. The entry screen is displayed.
) icon in the Tool bar on the top pane of the Manifest entry workbench. The entry screen is displayed.

It displays the below sections:
1.Booking Forecast EDI download
2.Voyage Updation
3.Allocation Details
The details to enter the inputs in each field of the above sections are explained below.
Note: In each section, the fields marked as * are mandatory.
1.Booking Forecast EDI download

Downloading the CSV file
i.Select the name of the Sender Agency from the drop-down list. The sender agency is the one who sends the list of -----?
ii.Click Select files to upload the file containing the container details of the previous loading port??
iii.Select the port from the drop-down list (port of sender)?
iv.Click Download.
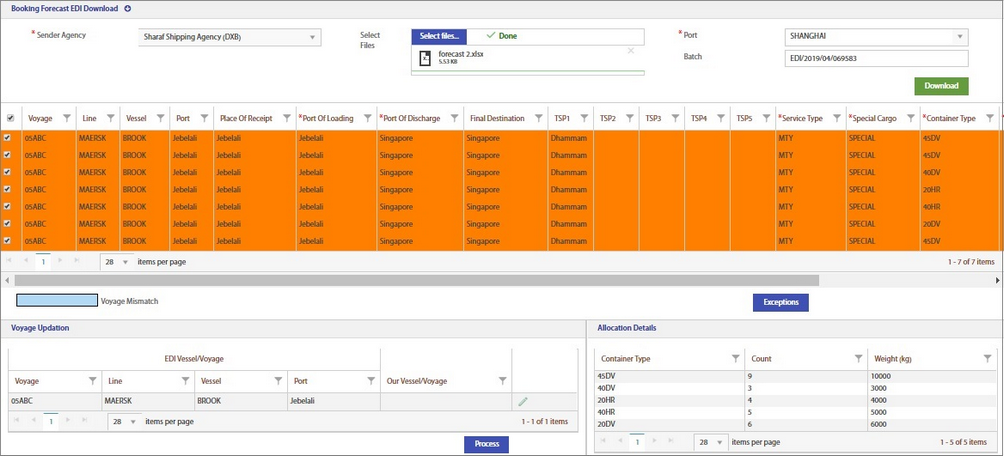
The details in the file are automatically populated in a tabular form below.
In the below sections Voyage Updation & Allocation Details, the values in all the fields are auto-updated as shown in the below image.
Batch number is auto-generated.

Correcting the records
If any of the record downloaded from the file has an error, the particular row containing the record is shown in orange colour. To know the error and correct the record, click the edit icon at the right end column.

The erroneous field is shown highlighted (TSP1 in this case) as in the below image.
This means that transshipment 1 Dhammam is wrong.
![]()
Select the correct TSP1 (JAKARTA shown for example) from the drop-down list. Click the Save icon to update the changes. The corrected record changes to blue color.
Check Voyage mismatch.
![]()
Similarly, edit all the erroneous records (in orange color) one by one and click save. All corrected records will change to blue color.

•By default, all the records downloaded from the file are selected
•User can select particular records to update the actual voyage
•Voyage mismatch / ?
2.Voyage Updation
This section allows users to check the voyage downloaded from the file and correct the voyage if required.
The voyage mapping is done as follows.

Vessel/Voyages received from the CSV file will be displayed in left side, user can select the actual Vessel/Voyage in right side field.
Click the Edit icon. Select the voyage from the drop-down list.
The voyages available in our system are listed with Voyage – Line – Vessel – Port name from the voyage master for which voyage mode is ‘Feeder’.

Click Process.
The voyage is automatically assigned to the selected entries.
Notes:
1.Only those voyage combinations that are available in Voyage master will be displayed in Our Vessel/Voyage field automatically. User has provision to change the voyage also.
2.For the voyage combinations that are not available in Voyage master, the field Our Vessel/Voyage field will be displayed as blank. User has to select the correct voyage from the drop-down list.
3.The entries for which voyage has not been changed as per the agency voyage will be highlighted in different color (as per attachment). Only when final save is done, screen will be cleared. Those rows should be displayed under “Voyage Mismatch”.
4.Users can check voyage received in the file and accordingly assign the correct voyage
5.The entries for which voyage has not been changed as per the agency voyage should be highlighted in different color (as per attachment). Only when final save is done, screen will be cleared. Those rows should be displayed under “Voyage Mismatch”.
Exceptions
Validation check
While downloading the file from a particular agency, system validates whether the same file has been received earlier from the same agency. After comparison, the exception file will display the old Quantity/Weight and the new Quantity/Weight.

To add more details from BRS.
3.Allocation Details
This section displays the summary of the list of container type, total count of each container type and the total weight of the particular container type.
