Creating Business Partner |
  
|
Creating Business Partner |
|
To create a business partner, perform the following:
1.On the application home page, in the left pane, click Master Business Partner. The Business Partner workbench appears on the right pane like the one shown below:

2.In the right pane, click Add (![]() ) icon in the menu bar. The Business Partner creation page appears.
) icon in the menu bar. The Business Partner creation page appears.
3.In the Business Partner header, provide the following details:
i.Enter Code and Name for the business partner in the respective fields.
ii.Choose Tag from the drop-down menu as Business Partner, Liner, or Agent.
iii.Choose Classification from the drop-down menu as High Potential, Low Potential, Medium Potential, VIP Partner, or Yet to Define.
iv.Choose the required Parent Company from the drop-down menu.
Note: By default, the Status will be ACTIVE.
v.Choose Account Type from the drop-down menu as Account Receivable, Account Payable, or Both.

4.In the Business Types tag, perform the following:
i.Click add (![]() ) icon to add the business type.
) icon to add the business type.
ii.Choose the required Business Activity from the drop-down menu.
iii.Choose Account Type from the drop-down menu as Account Receivable, Account Payable, or Both.
iv.Choose the required Default Address from the drop-down menu.
Note: By default, the Status will be ACTIVE.

v.Click Save (![]() ) icon to save the business type.
) icon to save the business type.
5.In the Address tag, perform the following:
i.Click add (![]() ) icon to add the address.
) icon to add the address.
A Edit pop-up window appears.
ii.In the Edit window, perform the following:
a.In Address Header, provide the following details:
✓Choose the required address Type from the drop-down menu.
✓Enable Default if you want to make the address type as the default address type.
✓Enter Address.
Note: By default, Party Type will be chosen.
✓Choose the required Country, State, City, and Zip from the respective drop-down menus.
✓Enter PO Box No and PO Box Name.
b.In Communication Details, provide the following details:
✓Enter Telephone, Fax No, Primary Mobile No, Secondary Mobile No, Primary Email, and Secondary Email.
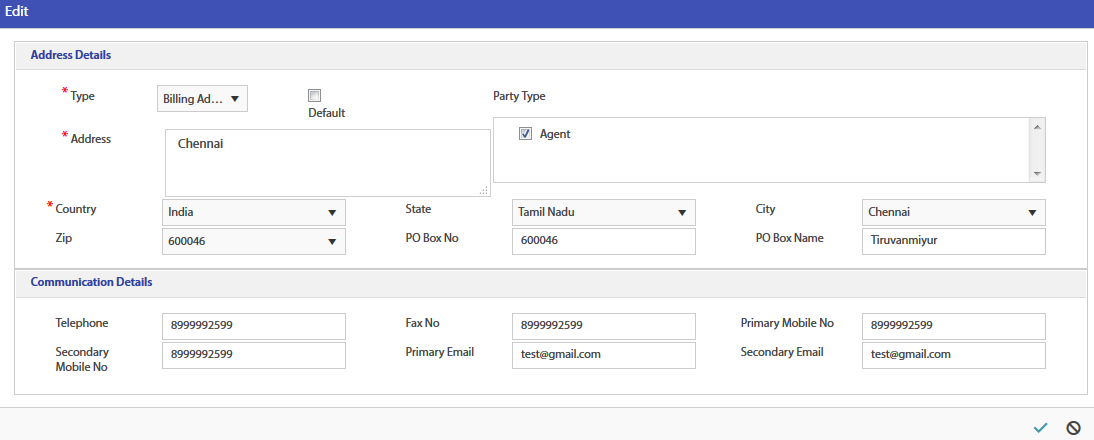
c.Click Save (![]() ) icon to save the address.
) icon to save the address.
6.In the Contacts tag, perform the following:
i.Click add (![]() ) icon to add the contact.
) icon to add the contact.
A Edit pop-up window appears.
ii.In the Edit window, perform the following:
a.In Address Details, provide the following details:
✓Choose Salutation from the drop-down menu.
✓Choose Gender from the drop-down menu as Male or Female.
✓Enter First Name, Middle Name, and Last Name.
b.In Communication Details, provide the following details:
✓Enter Office, Mobile, Residence, Personal Email, Office Email Id, and Alternative Email.
c.In Contact More Details, provide the following details:
✓Choose Nationality and Designation from the respective drop-down menus.
✓Enter Skype ID, FaceBook ID, Twitter ID, MSN ID, and Yahoo ID.
Note: By default, Status will be ACTIVE.
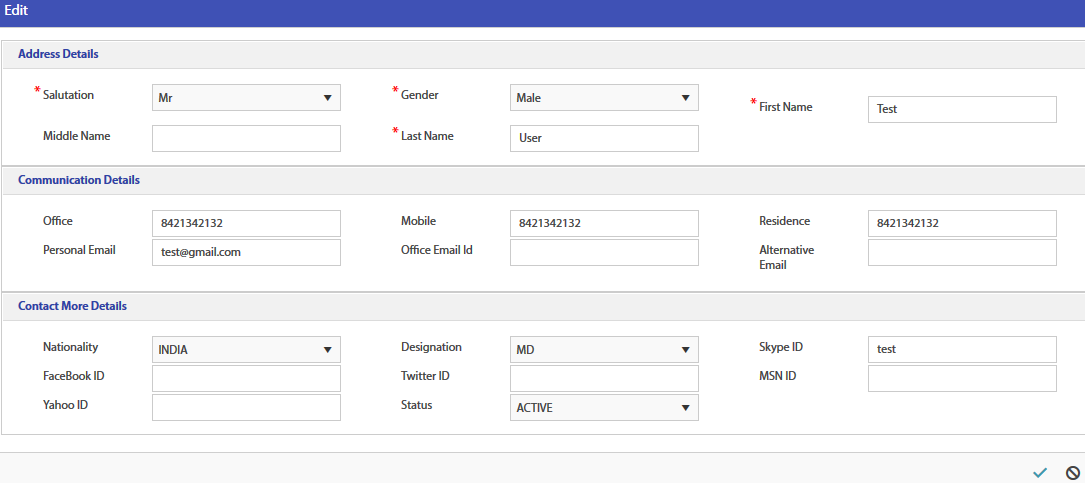
d.Click Save (![]() ) icon to save the contact.
) icon to save the contact.
7.In the Credit Details tag, perform the following:
i.Click add (![]() ) icon to add the credit details.
) icon to add the credit details.
ii.Choose Account Type from the drop-down menu as Account Receivable, Account Payable, or Both.
iii.Choose Currency Name from the drop-down menu.
iv.Enter Limit Amount, Over Due Amount, Buffer Percentage, Final Limit, PDC Days, and Credit Days.
v.Choose Late Payment Type from the drop-down menu as Due Dates or OutStanding.
vi.Enter Late Payment Percentage and Late Payment Start Days.
vii.Choose Last Review Date and Next Review Date using the date picker (![]() ) icon.
) icon.

viii.Click Save (![]() ) icon to save the credit details.
) icon to save the credit details.
8.In the Bank Details tag, perform the following:
i.Click add (![]() ) icon to add the bank details.
) icon to add the bank details.
ii.Enter Priority, Bank Name, Account No, Currency Name, Swift Code, IBAN Code, Sort Code, IFSC Code, and RTGS Code.
Note: By default, Status will be ACTIVE.

iii.Click Save (![]() ) icon to save the bank details.
) icon to save the bank details.
9.In the Custom Details tag, perform the following:
i.Click add (![]() ) icon to add the custom details.
) icon to add the custom details.
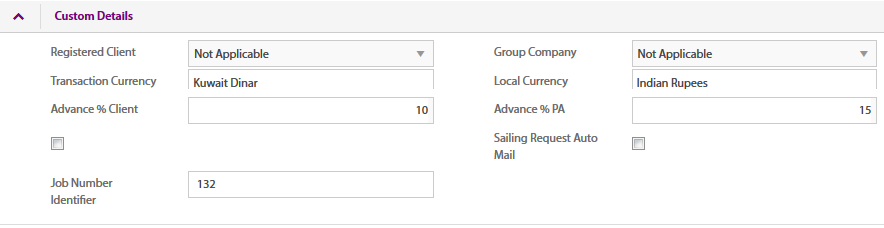
ii.Choose Registered Client from the drop-down menu as Yes, No, or Not Applicable.
iii.Choose Group Company from the drop-down menu as Yes, No, or Not Applicable.
iv.Enter Transaction Currency, Local Currency, Advance % Client, and Advance % PA.
v.In Sailing Request Auto Mail, enable or disable auto email.
vi.Enter Job Number Identifier.
10.In the KYC tag, perform the following:
i.Click add (![]() ) icon to add the KYC.
) icon to add the KYC.
ii.Choose Document Name from the drop-down menu as Company Logo or Company Registration.
iii.Enter Document Number, Issued By, and Issued To.
iv.Choose Issue Date and Date Of Expiry using the date picker (![]() ) icon.
) icon.
v.In File, click Select files to upload the required document.
Note: By default, Status will be ACTIVE.

vi.Click Save (![]() ) icon to save the KYC details.
) icon to save the KYC details.
11.In the menu bar, click Save (![]() ) icon to save the master. A pop-up window appears.
) icon to save the master. A pop-up window appears.
12.Click OK to save the master.