Adding a new Manifest Entry Export - Sea |
  
|
Adding a new Manifest Entry Export - Sea |
|
Steps to create a Manifest entry:
1.Provide the header details
2.Add Routing information
3.Add Rate Details
4.Add party details
5.Add Marks and Numbers, Clause details
6.Add Additional information
7.Add Attachments and Notes
Notes:
✓Once all the details are provided, BL will be created and status should automatically display as Created.
✓BL number can be either manually entered by user or it can be auto generated by the system using BI stock available.
✓User can create two or more manifest for a single container (Part Container).
✓Single container can have single or multiple cargo.
Manifest Entry Procedure:
Click the Add (![]() ) icon in the Tool bar on the top pane of the Manifest Entry workbench. The entry screen is displayed.
) icon in the Tool bar on the top pane of the Manifest Entry workbench. The entry screen is displayed.
It displays the below sections:
1.Manifest Header
2.Manifest Routing
3.Cargo Details
i.Break Bulk Details
ii.Container Details
iii.Vehicle Details
4.Rate Details
5.Party Details
6.Marks and Numbers
7.Clause Details
8.Additional Info
9.Attachment & Notes
The details to enter the inputs in each field of the above sections are explained below.
Note: In each section, the fields marked as * are mandatory.
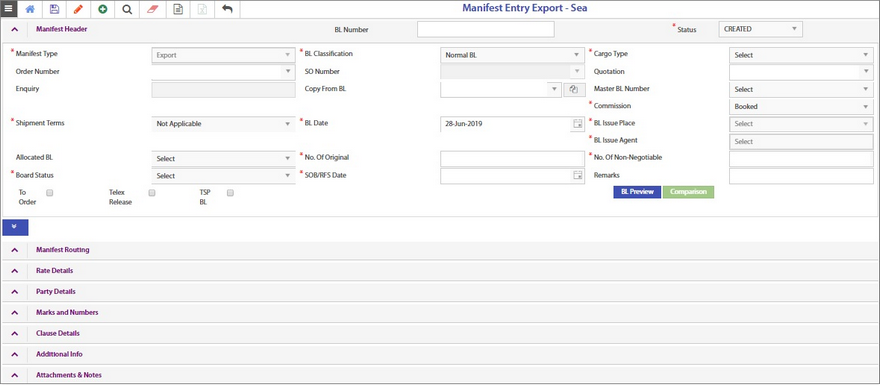
1. Manifest Header
The Manifest Header displays the below fields (Refer the above image).
Fields |
Input Instructions |
BL Number |
Enter the BL number |
Status |
By default, the status shows Created |
Manifest Type |
This field is not enabled to enter any input, it displays Export by default |
BL Classification |
Select the BL classification from the drop-down list. It displays the below options. •Empty BL •Master BL •Normal BL Note: The cargo details section will not be displayed if Empty BL is selected. |
Cargo Type |
Select the cargo type from the drop-down list. It displays the below options •Break Bulk •Container •General cargo •RoRo Note: Based on the selected cargo type, the corresponding sections will be displayed in the expand/ collapse section |
Order Number |
Select the order number from the drop-down list |
SO Number |
This field is disabled |
Quotation |
Select the quotation number from the drop-down list |
Enquiry |
This field is disabled |
Copy from BL |
Select the BL? from the drop-down list |
Copy BL Details icon ?? |
|
Master BL Number |
Select the Master BL number from the drop-down list |
Commission |
Select the commission type from the drop-down list. It displays the below options •Booked •Nil commission •Non-Booked |
Shipment terms |
Select the type from the drop-down list. It displays the below options •All in •Free in •Free in/out •Free out •Not Applicable |
BL Date |
Select the date from the drop-down calender |
BL Issue Place |
This field is disabled |
BL Issue Agent |
This field is disabled |
Allocated BL |
Select the BL from the drop-down list |
No. of Original |
Enter the number of ?? |
No. of Non-Negotiable |
Enter the number of ?? |
Board status |
Select the BL from the drop-down list. It displays the below options: •Received for shipment •Received on board |
SOB/RFS Date |
Select the date from the drop-down calender |
Remarks |
Enter remarks if any |
•To Order •Telex Release •TSP BL |
Select the check box options, whichever is applicable |
BL Preview |
|
Comparison |
|
1) Telex release is done to acknowledge Consignee that the shipper has surrendered the Original Bill of Lading that has been issued to them. This is mostly created for Export BL’s.
2) If the manifest is marked as “Telex Release”, then based on the template defined, separate email has to be triggered to the consignee which can allow the carrier at destination to release your cargo without presentation of the hard-copy of Original Bill of Lading.
Click the Expand/Collapse icon to view all the other sections [or] Click the Arrow icon to open each section separately.
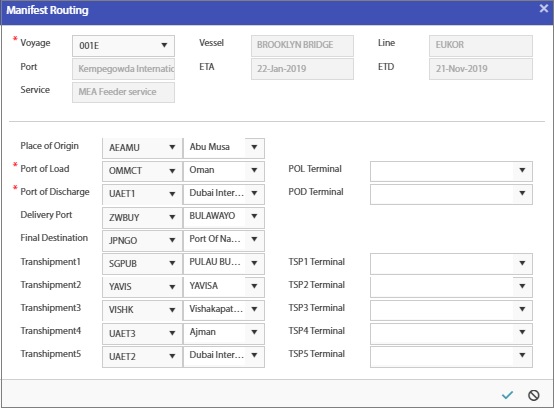
2. Manifest Routing
Click the Add (![]() ) icon in the main screen. The Manifest Routing screen is displayed.
) icon in the main screen. The Manifest Routing screen is displayed.
Fields |
Input Instructions |
Voyage |
Select the voyage from the drop-down list |
Vessel |
These fields are automatically updated upon selecting Voyage |
Line |
|
Port |
|
ETA |
|
ETD |
|
Service |
Fields |
Input Instructions |
Place of Origin |
In all these fields, select the name of the places from the drop-down list. |
Port of Load |
|
Port of Discharge |
|
Delivery Port |
|
Final Destination |
|
Transhipment1 |
|
Transhipment2 |
|
Transhipment3 |
|
Transhipment4 |
|
Transhipment5 |
|
POL Terminal |
|
POD Terminal |
|
TSP1 Terminal |
|
TSP2 Terminal |
|
TSP3 Terminal |
|
TSP4 Terminal |
|
TSP5 Terminal |
Click the save icon to save the details. It will be updated in the main entry screen as shown below.

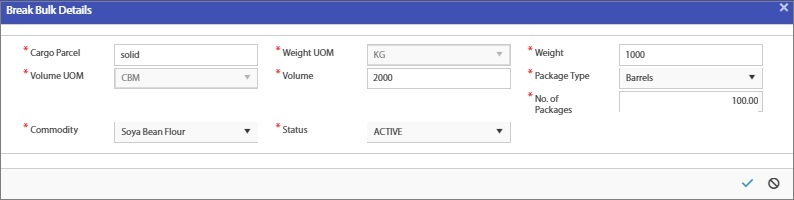
3a. Break Bulk Details
This section will be displayed if Break Bulk is selected in the Cargo Type field of the Manifest Header section.
Click the Add (![]() ) icon. The Break Bulk Details screen is displayed.
) icon. The Break Bulk Details screen is displayed.
Fields |
Input instructions |
Cargo Parcel |
Enter the name of ?? |
Weight UOM |
By default, it is KG |
Weight |
Enter the weight |
Volume UOM |
By default, it is CBM |
Volume |
Enter the volume |
Package Type |
Select the package type from the drop-down list |
No. of Packages |
Enter the number of packages |
Commodity |
Select the name of the commodity from the drop-down list |
Status |
By default, status is Active |
Click the Save icon to save the details.

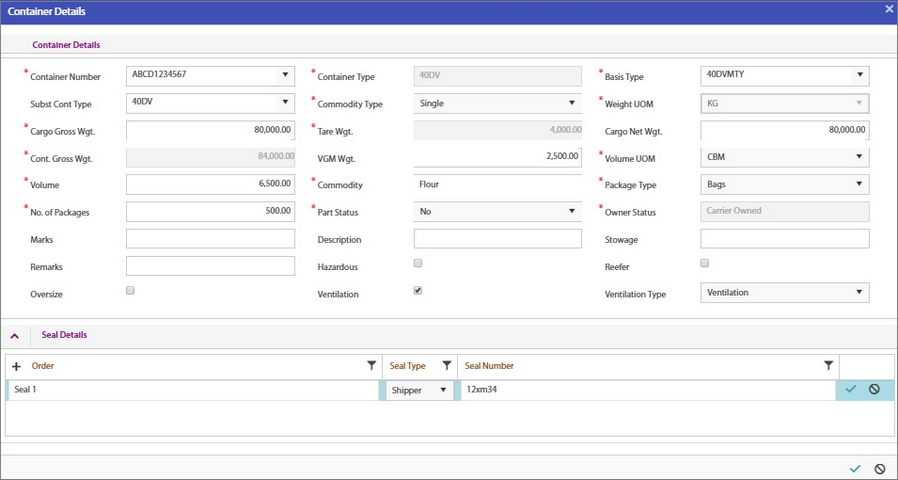
3b. Container Details
This section will be displayed if Container is selected in the Cargo Type field of the Manifest Header section.
Click the Add (![]() ) icon. The Container Details screen is displayed.
) icon. The Container Details screen is displayed.
Fields |
Input Instructions |
Container Number |
Select the container number from the drop-down list |
Container Type |
This field is automatically updated upon selecting the container number |
Basis Type |
Select the Basis Type from the drop-down list |
Subst Cont Type |
Select the Subst Cont Type from the drop-down list |
Commodity Type |
Select the commodity type as Single or Multiple |
Weight UOM |
By default, it is KG |
Cargo Gross Wgt |
Enter the Gross Weight of the cargo |
Tare Wgt |
This field is automatically updated upon selecting the container number |
Cargo Net Wgt |
This field is automatically updated upon selecting the Cargo Gross Wgt |
Cont. Gross Wgt |
This field is automatically updated upon selecting the Cargo Gross Wgt |
VGM Wgt |
Enter the VGM weight |
Volume UOM |
By default, it is CBM |
Volume |
Enter the volume of ?? |
Commodity |
Enter the commodity name |
Package Type |
Select the Package type from the drop-down list |
No. of Packages |
Enter the number of packages |
Part Status |
Select the part status as Yes or No. |
Owner Status |
This field is automatically updated upon selecting the container number |
Marks |
Enter marks |
Description |
Enter the description of ?? |
Stowage |
Enter the stowage of ?? |
Remarks |
Enter Remarks if any |
Hazardous |
Select the type of container from these options. Note: If Ventilation is selected, select the type of ventilation as : •Full door open •Partial door open •Ventilation |
Reefer |
|
Oversize |
|
Ventilation |
3c. Seal Details
This section is a part of the Container Details screen.
Fields |
Input Instructions |
Order |
Enter the order number |
Seal Type |
Select the Seal Type from the drop-down list. It displays the below options. •Carrier •Customer •No Seal •Shipper |
Seal Number |
Enter the seal number |
Click the Save icon to save the details. The details are updated in the main screen as below.


3c. General cargo - breakbulk details ??
This section will be displayed if General cargo is selected in the Cargo Type field of the Manifest Header section.
Click the Add (![]() ) icon. The Break Bulk Details screen is displayed. Follow the same steps as mentioned for Break Bulk section.
) icon. The Break Bulk Details screen is displayed. Follow the same steps as mentioned for Break Bulk section.
3d. Vehicle Details
This section will be displayed if RoRo is selected in the Cargo Type field of the Manifest Header section.
Click the Add (![]() ) icon. The Vehicle Details screen is displayed.
) icon. The Vehicle Details screen is displayed.
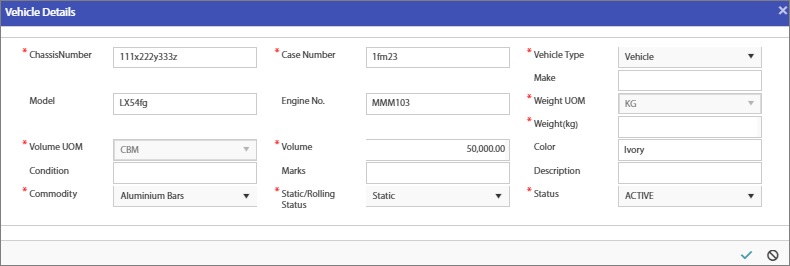
Fields |
Input Instructions |
ChassisNumber |
Enter the chassis number of the vehicle |
Case Number |
Enter the case number of the vehicle |
Vehicle Type |
Select the vehicle type from the drop-down list |
Make |
Enter the Make, Model and Engine No. |
Model |
|
Engine No. |
|
Weight UOM |
By default, it is KG |
Weight (kg) |
Enter the weight |
Volume UOM |
By default, it is CBM |
Volume |
Enter the Volume, Color, Condition, Marks and Description |
Color |
|
Condition |
|
Marks |
|
Description |
|
Commodity |
Select the commodity from the drop-down list |
Static/Rolling Status |
Select the status from the drop-down list as Static or Rolling |
Status |
The default status is Active |
Click the Save icon to save the details.
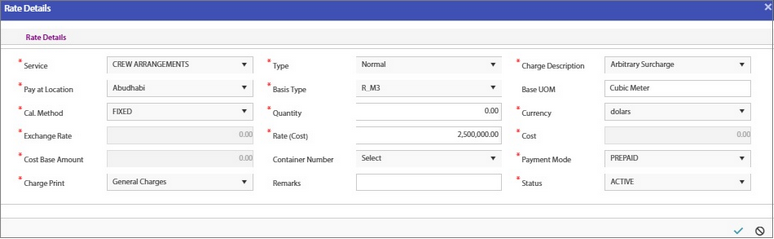
4. Rate Details
Click the Add (![]() ) icon. The Rate Details screen is displayed.
) icon. The Rate Details screen is displayed.
Fields |
Input Instructions |
Service |
- Select the service from the drop-down list |
Type |
- Select the type from the drop-down list. It displays the following: •IMO •Normal •OOG •Reefer |
Charge Description |
- Select the charge description from the drop-down list |
Pay at Location |
- Select the place at which payment is to be done |
Basis Type |
- Select the basis type from the drop-down list |
Base UOM |
This field is automatically updated upon selecting Basis Type |
Cal. Method |
- By default, it is set to FIXED |
Quantity |
- Enter the number for ?? |
Currency |
- Select the currency from the drop-down list |
Exchange Rate |
- This field is disabled |
Rate (Cost) |
- Enter the rate |
Cost |
- This field is disabled |
Cost Base Amount |
- This field is disabled |
Container Number |
- Select the container number from the drop-down list |
Payment Mode |
- Select the payment mode from the drop-down list. It displays the following: •Collect •Not Applicable •Prepaid |
Charge Print |
- Select the charge print from the drop-down list |
Remarks |
- Enter remarks if any |
Status |
- Select the status from the drop-down list. By default, it is set to ACTIVE. |
Click the Save icon to save the details.
•If manifest is created from order, then rates of main route mode = 'Sea' and its related service rate will be fetched.
•User can add the rates manually.
•Charges will be fetched from charge master.
5. Party Details
Party details includes Shipper, Consignee and Notify etc. If the export manifest is created based on the Order, then the party details will be auto fetched from the Order screen.
Click the Add (![]() ) icon. The below mentioned fields are displayed.
) icon. The below mentioned fields are displayed.

Fields |
Input Instructions |
Party Type |
Select the party type from the drop-down list |
Party Name |
Select the party name from the drop-down list |
Address |
Address is automatically updated upon selecting party name |
Telephone |
Enter the contact number of the party |
Fax |
Enter the fax number of the party |
Enter the mail id of the party |
|
POC |
Enter the point of contact of ??? |
Address on BL |
This field is automatically updated upon selecting party name |
Status |
Update the status. By default, status is ACTIVE |
Click the Save icon to save the details.

Click the Add (![]() ) icon to add a new row.
) icon to add a new row.
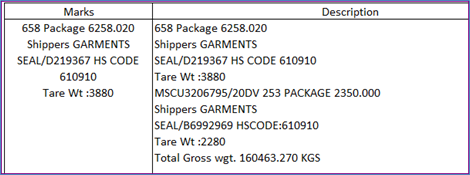
6. Marks and Numbers
Click the Add (![]() ) icon. The Marks & Numbers screen is displayed.
) icon. The Marks & Numbers screen is displayed.
Fields |
Input Instructions |
Marks |
<<Give input>> |
Description |
<<Give input>> |
Status |
<<Give input>> |
Click the Save icon to save the details.
Example:
7. Clause Details
Fields |
Input Instructions |
Clause Code |
<<Give input>> |
Print On BL |
<<Give input>> |
Clause Description |
<<Give input>> |
Status |
<<Give input>> |
Clause fetch?? |
<<Give input>> |
8. Additional Info
Fields |
Input Instructions |
Prompt |
<<Give input>> |
Value |
<<Give input>> |
Status |
<<Give input>> |
Click the Save icon to save the details.
Click the Add (![]() ) icon to add a new row.
) icon to add a new row.
9. Attachment & Notes
Files
Click the Add (![]() ) icon. The below mentioned fields are displayed.
) icon. The below mentioned fields are displayed.
Fields |
Input Instructions |
Attachment Type |
Select the file name from the drop-down list |
File Name |
Double click select files to open the file location. Upload the file |
Status |
Mark the status |
Click the Save icon to save the details.
Note:
Click the Add (![]() ) icon. The below mentioned fields are displayed.
) icon. The below mentioned fields are displayed.
Fields |
Input Instructions |
Note Type |
Select the note type from the drop-down list |
Notes |
Enter the Notes |
Status |
Mark the status |
Click the Save icon to save the details.