Container |
  
|
Container |
|
Steps to create an entry for container operations - Operation entry section
1.In the Parcel Type field, select Container from the drop-down list. The below screen is displayed.
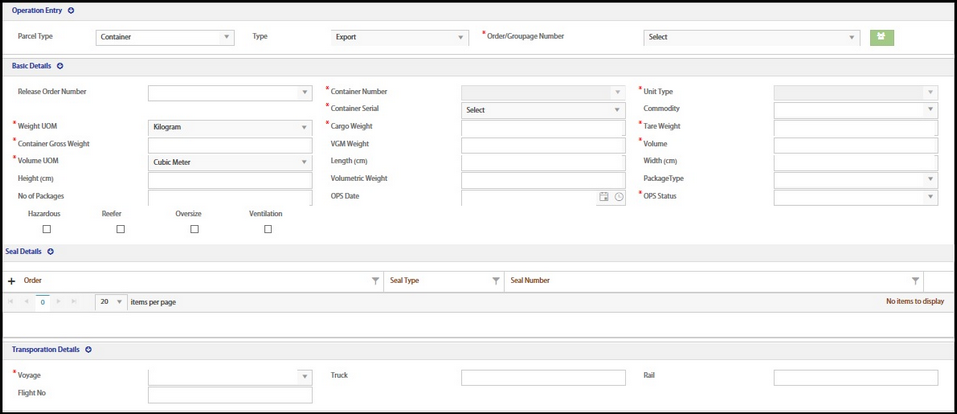
It displays the below 3 sections:
•Basic Details
•Seal Details
•Transportation Details
2.Select the Type as Export or Import from the drop-down list.
3.Select the Order/Groupage number from the drop-down list. Once the order number is selected, the fields Height, No. of Packages, Container Serial, Cargo weight, Length, Volumetric weight, Commodity and Package Type are automatically updated in the Basic Details section. Refer screen below.
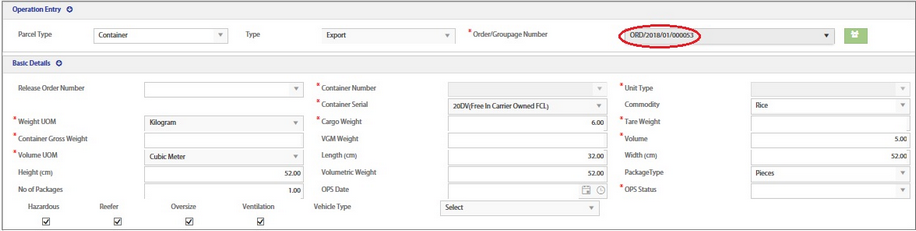
Basic Details:
The explanation to enter the data in each of the fields is explained below.
1.Release Order Number- Select the Release Order Number from the drop-down list. The list of release order numbers are fetched from Order entry table against the particular order number selected in header grid.
2.Container Number - Select the Release Order Number from the drop-down list. The list of containers are fetched from Container Master based on specific event group OPERATION_EVENT_GROUP
3.Unit type- The value in this filed is auto fetched based on the selected Container Number.
4.Container Serial - Select the Container Serial from the drop-down list.
5.Commodity - The value in this filed is auto fetched based upon the serial selected from the selected order. While fetching the container, based on equipment serial available in operation screen for that container, we can identify whether the container is for single commodity or for multiple commodity.
6.Weight UOM & Cargo Weight - Auto fetched based upon the serial selected.
Note: User can edit and update this field manually.
7.Tare Weight - The value in this filed is auto fetched from the container master based on the container number and the type selected, else user can edit and update this field manually.
8.Container Weight - Cargo weight + tare weight
9.VGM Weight - Enter the VGM weight of ?
10.Volume- Enter the volume of ?
11.Volume UOM - Auto fetched based upon the serial selected.
12.In the fields Height(cm), Width(cm), Length(cm) & Volumetric Weight, the values are auto fetched based upon the serial selected, else user can edit and update manually.
13.In the fileds Package Type & Number of Packages, the values are auto fetched based upon the serial selected.
Note: User can edit to select the package type from the package master.
14.OPS Status- Select the status from the drop-down menu.
15.OPS Date- Select the date & time
User can also skip these 2 fields and save the record.
Note: Fields marked in * are mandatory.
Container Type details:
1.Select the respective check box based on the container type required. User can select one or more types.
![]()
The corresponding details for the selected type is displayed upon selecting the check box.
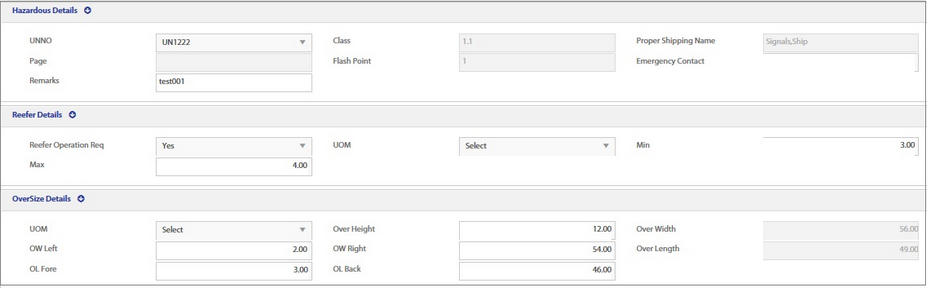
a.Hazardous
1.The fields UNNO, Class, Proper Shipping Name, Page and Flash Point are auto fetched based on the order.
2.Enter Emergency contact and Remarks if any.
b.Reefer
The fields are auto fetched. [or]
1.Select Yes in the Reefer Operation Req field
Note: If No is selected, other fields are not enabled.
2.Select UOM as Celcius
3.Enter the temperature values in the Min and Max fields
c.Oversize
All the fields are auto fetched based on the order details.
d.Ventilation
On selecting the Ventilation check box, the vehicle type field is displayed.
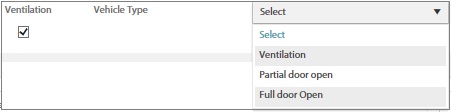
Select the required vehicle type from the drop-down list.
Seal Details
Enter the seal details as below:

1.Click the Add (![]() ) icon to add the seal details.
) icon to add the seal details.
2.In the Seal Type field, select the type as Customer, Carrier or Shipper from the drop-down menu.
3.In the Seal Number field, enter the seal number.
4.Click Save (![]() ) icon to save the entry. In the Order field, the number Seal 1 is displayed.
) icon to save the entry. In the Order field, the number Seal 1 is displayed.
To add further entries:
Again click the Add (![]() ) icon to add a second entry & Save (
) icon to add a second entry & Save (![]() ) icon to save the entry.
) icon to save the entry.
Transportation Details
In the Voyage field, the Voyage details are auto fetched from the Voyage Master / Order entry program.

1.Enter the values in the fields Truck, Rail and Flight No, if they are not auto fetched.
2.Click Save (![]() ) icon to save the data.
) icon to save the data.