RoRo |
  
|
RoRo |
|
Steps to create an entry for RoRo operations:
1.In the Parcel Type field, select RoRo from the drop-down list. The below screen is displayed.
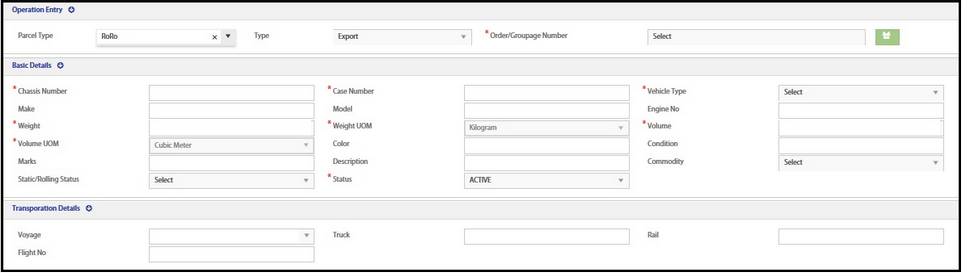
It displays the 2 sections:
•Basic Details
•Transportation Details
2.Select the Type Export or Import from the drop-down list.
3.Select Order/Groupage number from the drop-down list.
Basic Details:
The explanation to enter the data in each of the fields is explained below.
•Chassis Number - Enter the chassis number of the RoRo
•Case Number - Enter the case number
•Vehicle Type - Select the vehicle type as Equipment or Vehicle from the drop-down list
•Make - Enter the make number
•Model - Enter the Model name
•Engine No - Enter the engine number
•Weight - Enter the weight of ?
•Weight UOM - By default, Kilogram is displayed as the UOM
•Volume - Enter the volume of ?
•Volume UOM - By default, Cubic Meter is displayed as the UOM
•Color - Enter the color of ?
•Condition - Enter the condition of ?
•Marks - Enter the Marks of ?
•Description - Enter the description of ?
•Commodity - Select the commodity from the drop-down menu
•Static/Rolling status - Select Rolling or Static from the drop-down menu
•Status - By default, status is Active ?
Transportation Details:
1.In the Voyage field, the Voyage details are auto fetched from the Voyage Master / Order entry program.[confirm]

2.Enter the values in the fields Truck, Rail and Flight No, if they are not auto fetched.
3.Click the Save ( ) icon to save the data.