Manifest Corrector Functionality |
  
|
Manifest Corrector Functionality |
|
A. Steps to correct a Manifest
1.Click Manifest >> Manifest Corrector in the left navigation pane of the Application Home page. The Manifest Corrector workbench will be displayed.
2.Click the Add (![]() ) icon in the Tool bar. The Manifest corrector Entry screen is displayed.
) icon in the Tool bar. The Manifest corrector Entry screen is displayed.
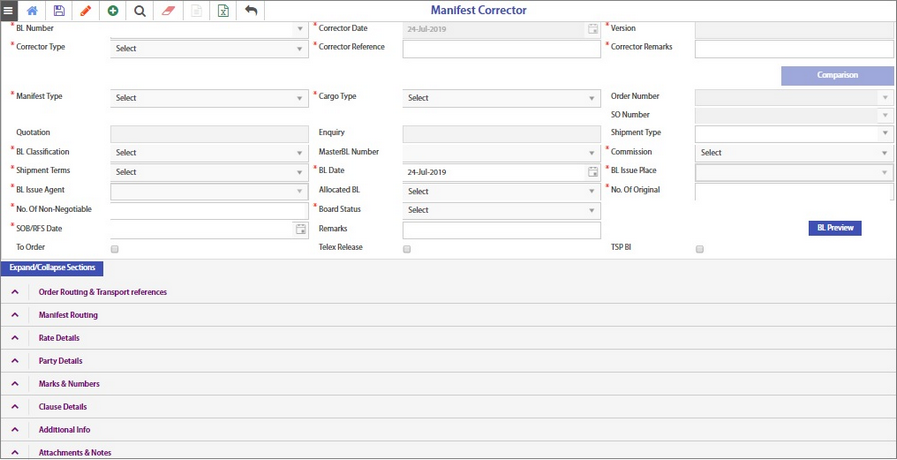
It has the following sections.
1.Header section
2.Expand/Collapse sections
In the Header section, select a particular BL for which manifest is required to be corrected. Program loads the results.
1.Make the corrections in the respective sections.
2.Save the Manifest corrector. Now, the corrector version is 1. If user again makes any changes for the same BL, the version number will be automatically saved as 2.
B. For Export Shipment
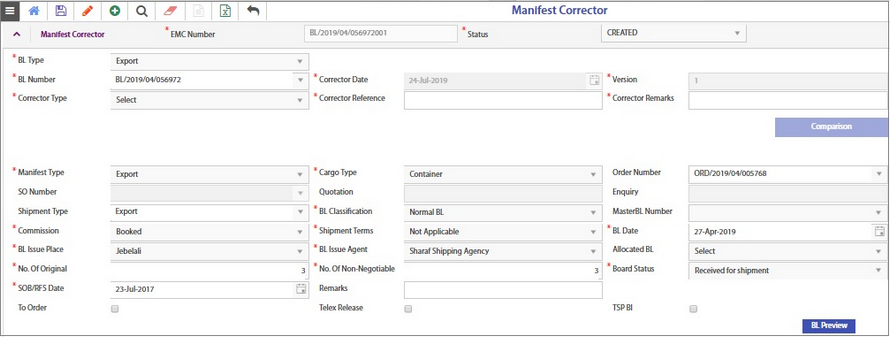
1.Select the BL Type as Export.
2.Select the BL number from the drop-down list. All BLs will not be listed based on specific bl status only – manifest will get listed in this field.
All the data defined in the Manifest entry will be auto-populated in the corrector screen under the respective columns. Some of the fields will be displayed blank in which user may input the data if required.
Manifest Header section
Each of the field is explained below.
•EMC Number - Auto created along with the version number. E.g. EMC will be BL/2019/04/056972001 for BL/2019/04/056972.
•Status - Auto displays as CREATED.
•Corrector Date - Auto picks the current date as the corrector date.
•Version - For first correction, 1 will be displayed. If user has already created a corrector and is in Completed/Approved status, then the corrector version will be displayed as 2.
•Corrector Type - Select Shipper Request or Consignee Request from the drop-down list. (When reqd?
•Corrector Reference - Enter any name or number for reference
•Corrector Remarks - Enter any comments if any.
•The fields Manifest Type, Cargo Type, Order Number, Shipment Type, BL Classification, Commission, Shipment Terms, BL Date, BL Issue Place, BL Issue Agent, No. of Original, No. of Non-Negotiable, Board Status and SOB/RFS Date will be auto-populated and are editable. Should this be editable?
•The fields SO Number, Quotation & Enquiry will be disabled
•The fields MasterBL Number, Allocated BL & Remarks are left blank. Should user update?
•The below checkboxes will be shown selected/unselected based on the BL.
oTo Order
oTelex Release
oTSP BL
Expand/Collapse sections
This section displays the below sections.
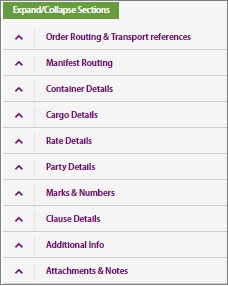
Note: All the sections except Order Routing & Transport references are editable.
•Once the voyage in the manifest is changed to new voyage, it should get changed in the Order linked with the manifest. where to include this??
Illustrations to show Manifest corrections
1. Container Details
In this section,
•Click the Edit icon at the right end column. The Edit screen will be displayed as below.
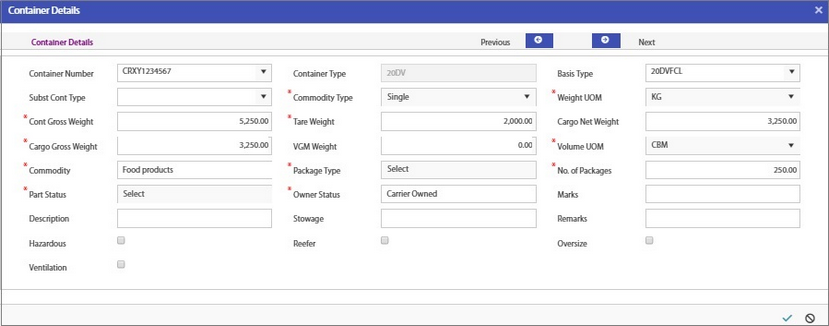
•Correct the required details & click Save.
•The changes done will be updated in the Manifest entry.
2. Rate Details
In this section,
•Click the Edit icon at the right end column. The Edit screen will be displayed as below.
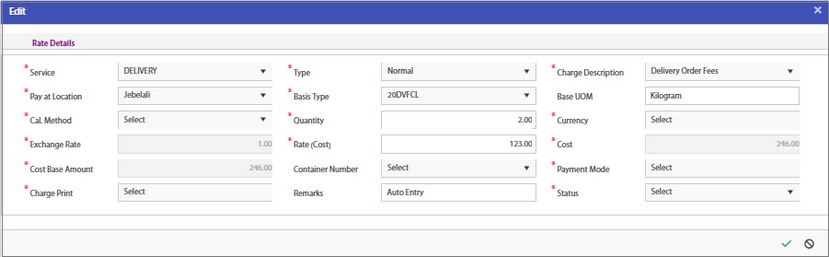
•Correct the required details & click Save.
•The changes done will be updated in the Manifest entry.
C. For Import Shipment
1.Select the BL Type as Import.
2.Select the BL number from the drop-down list. All BLs will not be listed based on specific bl status only – manifest will get listed in this field.
All the data defined in the Manifest entry will be auto-populated in the corrector screen under the respective columns. Some of the fields will be displayed blank in which user may input the data if required.
Exceptions
•The fields Order number and Allocated BL will be disabled for Import
•Order Routing & Transport references section will not be displayed under Expand/Collapse sections
D. Additional features:
1. Versioning system
First corrector:
After correcting the manifest and saving, the changes will be updated in the manifest and status of the first corrector will change from changed to Completed.
Second Corrector:
After completing the first corrector, user needs to proceed with the second corrector to make further changes in the manifest.
On selecting a BL number, the number in the Version column automatically changes to 2.
2. Manifest Comparison
•User can compare any 2 versions of the correctors or compare original manifest with any corrected versions of the manifest.
•Use the comparison icon in the header section for comparing the versions. This icon will be enabled only after EMC has been created/saved in system & will be greyed out i.e., during a new EMC updation.
oIf corrector 001 is selected, then comparison will be done between MANIFEST and EMC001.
oIf corrector 002 is selected, then comparison can be done either with MANIFEST or with EMC001.
| The results will be loaded based on the selection. Compare with drop-down will list manifest and EMC001 in the list. |
3. Email Alert
When any EMC has been completed or approved, mail will be auto-triggered to the respective department super user. Email and process type will be defined in email config.