Adding new events |
  
|
Adding new events |
|
This screen allows users to perform the following:
1.To add a new container event
2.To edit/update any container event
3.To delete an event
Adding a new container event
A. Click EQC >> Event Updation in the left navigation of the Application Home page. The Event Updation workbench sceen will be displayed. (refer previous topic).
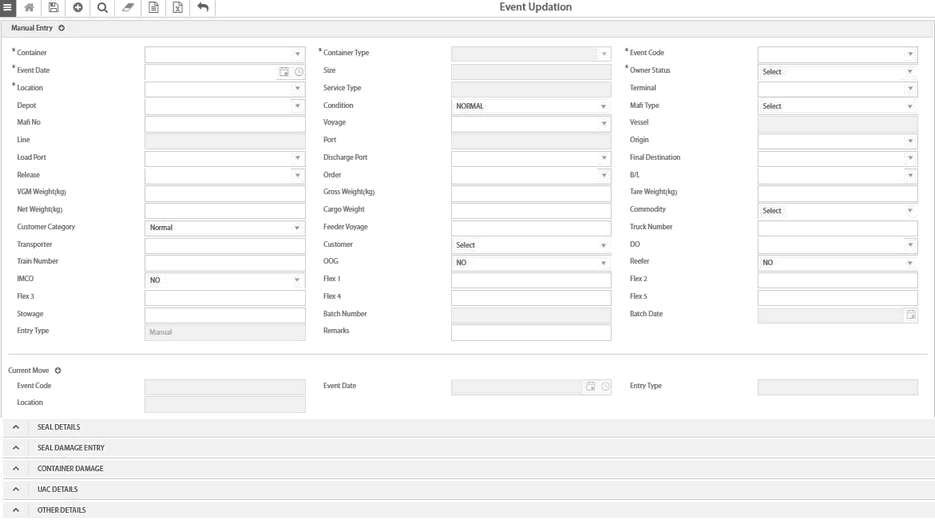
B. Click the Add (![]() ) icon in the Tool Bar. The manual entry screen will be displayed (Refer below image).
) icon in the Tool Bar. The manual entry screen will be displayed (Refer below image).
C. Enter the inputs in all the sections of the entry screen.
D. Click the Save (![]() ) icon to save the record. The new event is created.
) icon to save the record. The new event is created.
Fields marked in * are mandatory.
The manual entry program includes the below blocks:
1.Manual Entry Header
2.Seal details
3.Seal damage entry
4.Container damage
5.UAC details
6.Other Details
The fields in each of the above sections and the details to enter the inputs are described below.
1. Manual Entry Header
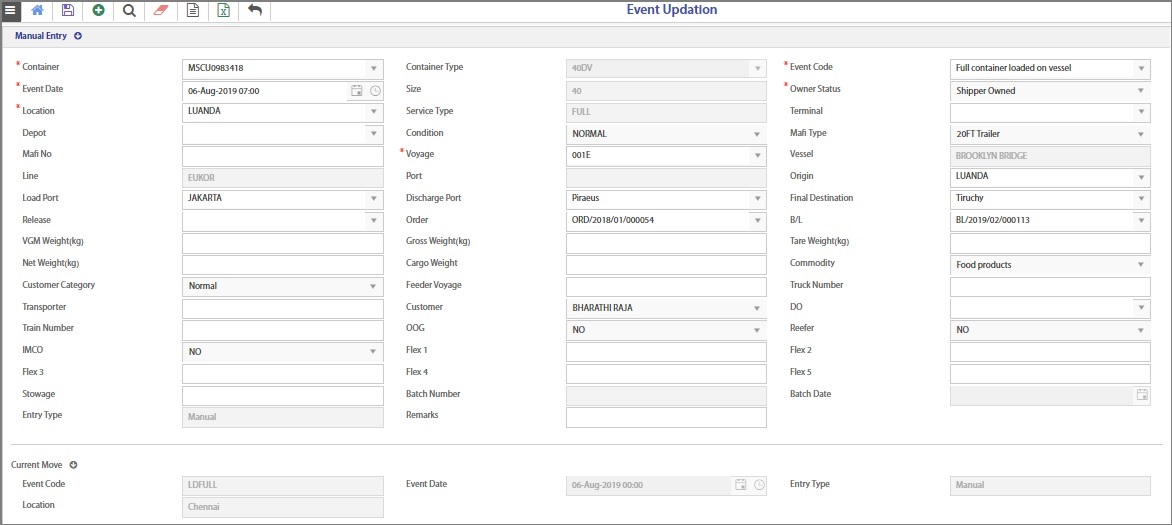
Container - Select the container from the drop-down list. The list displays Container number, Container type, Event code and location.
Event Code - Select the next move of the container from the drop-down list. It displays all the next logical moves based on the current move of the selected container.
Event Date - Select the date from the dropdown calendar and also select the time using the Timer icon.
Size - Auto fetched based on the container type
Owner status - Auto fetched
Location - Select the location from the drop-down list
Service Type - Auto fetched
Terminal - Select the terminal from the drop-down list
Depot - Select the Depot from the drop-down list
Condition - Select the condition from the drop-down list - it displays Normal, Leaking & Damaged
Mafi Type - Select the Mafi Type from the drop-down list.
Mafi No - Enter the Mafi no
Voyage - Select the voyage from the drop-down list. Vessel, Line and Port are auto fetched based on the voyage selected.
Vessel, Line - Auto fetched
Port - This field is disabled
Origin - Select the origin from the drop-down list
Load port - Select the load port from the drop-down list
Discharge port - Select the discharge port from the drop-down list
Final destination - Select the final destination from the drop-down list
Release - Select the release number from the drop-down list
Order - Select the Order from the drop-down list
B/L - Select the BL from the drop-down list
VGM weight(Kg) - Enter the numerical value
Gross weight(Kg) - Enter the numerical value
Tare weight(Kg) - Enter the numerical value
Net weight(Kg) - Enter the numerical value
Cargo weight(Kg) - Enter the numerical value
Commodity - Select the Commodity from the drop-down list
Customer Category - Select the Customer Category as Special or Normal from the drop-down list
Feeder Voyage - Enter the feeder voyage
Truck number - Enter the Truck Number
Transporter - Enter the Transporter
Customer - Select the customer name from the drop-down list
DO - Select the DO from the drop-down list
Train Number - Enter the Train number
OOG, Reefer & Imco - Select YES or NO from the drop-down list
Flex 1 to Flex 5 - Enter the details if applicable
Stowage - Enter the details if applicable
Batch Number & Date - This is applicable for moves downloaded via edi or csv
Entry type - Auto updated as Manual
Remarks - Enter Remarks if any.
Notes:
✓Event code will be blank for the first move of the containers.
✓On selecting the container, the fields Container Type, Size, Owner Status and Condition will be auto-updated.
✓Also, in the Current Move section, all the fields Event Code, Event Date, Entry Type and Location are auto-updated.
✓Two events can have the same dates but not the same time.
✓The Time of the new move should be always greater than the previous history move.
2. Seal Details
In the Seal Details section, click the Add (![]() ) icon. The below Edit screen will be displayed.
) icon. The below Edit screen will be displayed.

i.Select the Seal Type from the below options.
•No Seal
•Shipper
•Carrier
•Customer
ii.Enter the Seal Number.
iii.Select the condition from the below options.
•Good
•Bad
•Better
iv.Click the Save (![]() ) icon to save the record. The seal details will be updated in the main screen as shown below.
) icon to save the record. The seal details will be updated in the main screen as shown below.

For a particular shipment, multiple seals can be used in one container.
3. Seal Damage Entry
In the Seal Details section, click the Add (![]() ) icon. The below Edit screen will be displayed.
) icon. The below Edit screen will be displayed.

i.Enter the inputs in the fields as below.
•Seal Type & Seal Number- Auto fetched
•Reason - Select the reason as Mishandling or Human error
•Damage Type- Select Broken Completely or Damaged
•Supervisor - Enter the supervisor name
•Charges incurred - Enter the amount
•Currency - Select the currency from the drop-down list
•Documents Upload - Select the file to upload (what file)? includes what??
•Remarks - Enter remarks if any.
ii.Click the Save (![]() ) icon to save the record. The seal damage details will be updated in the main screen as shown below.
) icon to save the record. The seal damage details will be updated in the main screen as shown below.

Note: For containers having multiple seals linked, seal damage records can be multiple.
4. Container Damage
In shipping system, damages can happen to containers in a number of ways while handling at the port or depot or during transport.
If the information is received via some edi files like codeco/coarri, same will be downloaded automatically. However, details can also be manually captured in system.
In the Container Damage section, click the Add (![]() ) icon. The below Edit screen will be displayed.
) icon. The below Edit screen will be displayed.
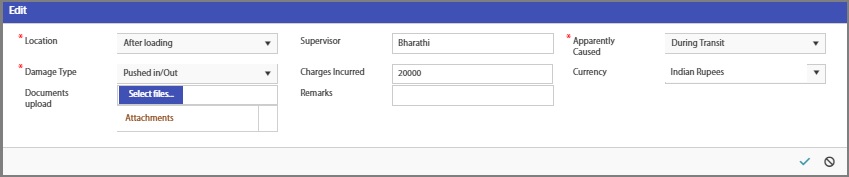
i.Update the damage details in the below fields.
•Location - Select the location from the drop-down list
•Supervisor - Enter the supervisor name
•Apparently caused - Select the reason from the drop-down list. If user selects as Others, it has to be mentioned in Remarks.
•Damage type - Select the damage type from the drop-down list. If user selects as Others, it has to be mentioned in Remarks.
•Charges incurred- Enter the amount
•Currency - Select the currency from the drop-down list
•Document Upload - Select the file to upload (what file)? includes what??
•Remarks - Enter remarks if any.
iii.Click the Save (![]() ) icon to save the record. The container damage details will be updated in the main screen as shown below.
) icon to save the record. The container damage details will be updated in the main screen as shown below.

5. UAC DETAILS
The details of the containers which have been discharged but not been picked by the consignee are added under UAC Details section.
In the UAC Details section, click the Add (![]() ) icon. The below Edit screen will be displayed.
) icon. The below Edit screen will be displayed.

i.Below are the fields to be updated in the UAC Details section.
•Discharge Date - Select the date from the drop-down calendar
•No. of Days- Enter the number of days
•UAC notice sent by- Enter the name of the sender
•UAC notice sent on- Select the date from the drop-down calendar
•Charges- Enter the amount
•Currency- Select the currency from the drop-down list
•Documents upload- Select the file to upload (what file)? includes what??
•Remarks- Enter remarks if any
ii.Click the Save (![]() ) icon to save the record. The UAC details will be updated in the main screen as shown below.
) icon to save the record. The UAC details will be updated in the main screen as shown below.
5. Other Details
In this section, any general notes can be added or can be customized based on individual locations requirement.
Ex: one way container related remarks can be updated in this section. This can be controlled via dynamic remarks type.
In the Other Details section, click the Add (![]() ) icon. The below Edit screen will be displayed.
) icon. The below Edit screen will be displayed.
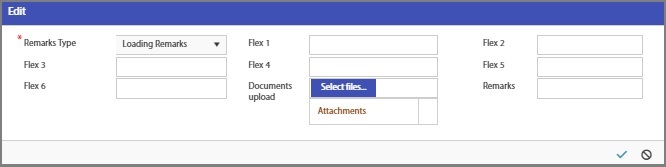
i.Update the below fields.
•Remarks Type - Select the location from the drop-down list
•Flex 1 to Flex 6 - Enter the comments
•Document Upload - Select the file to upload (what file)? includes what??
•Remarks - Enter remarks if any.
ii.Click the Save (![]() ) icon to save the record. The saved details will be updated in the main screen as shown below.
) icon to save the record. The saved details will be updated in the main screen as shown below.

Notes:
•While saving the container move entry, an alert message will be raised if any mandatory fields are missed.
•Also there are some additional fields available in dashboard as below. where??
▪Entry type - By default, this will be updated as Manual
▪Category - This category will be default Normal
▪Condition - Condition will be Normal (If suppose any damage details updated for a container then the condition should read as damaged)
▪Status- when saving the new event manually updated for a container, status will get updated as Success